# What is the Capture Center?
Capture Center allows the user to add files into Docufree via one central place, where you can index files at the time of capture. Docufree automatically stores the captured information in the selected folder location so only authorized users can view the information.
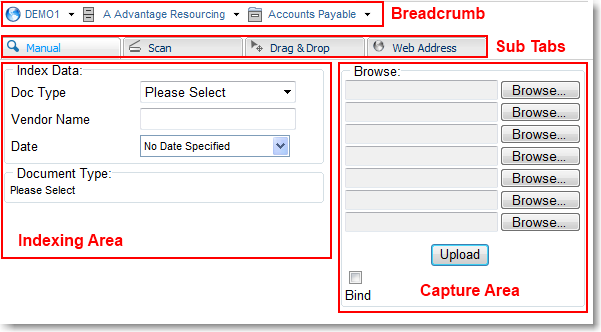
This topic describes areas that are common in all capture methods in the Capture Center.
# Breadcrumb Trail
Similar to the file list, the breadcrumb trail appears within the Capture Center.
- When you click the Capture Center tab the breadcrumb trail defaults to your inbox. Any files you capture will be placed in your inbox
- You can navigate to the appropriate folder location using the breadcrumb trail to capture the file to a location other than your inbox.
Best Practice
When you select Add File | Capture Center from your Inbox, Files, or the Viewer the current folder path is retained and any files you add are captured to that folder.
# Sub Tabs
These sub tabs allows you to select the method of capturing. They are available depending on your licensed features and permission setup.
- You can browse your local or network drives to manually select file(s) to upload to Docufree.
- You can scan images into Docufree.
- You can drag a file from you PC's desktop or local/network file folder and drop it into Docufree.
- You can upload a web address to Docufree.
TIP
If you capture a file that is password protected it cannot be rendered in the Viewer. For example, if you capture a Word document that is password protected you will not be able to view it in the Viewer.
TIP
There is a 255 character limit for the site/cabinet/drawer/folder path and file name. If a path and file name are longer than 255 characters the file will not be allowed to be added to Docufree.
Besides the capture methods allowed in the Capture Center, there are also other methods for importing files into Docufree.
# Indexing Area
When you have selected a location that supports index data, the index section appears in the Capture Center in the left. Files captured at these locations will receive the index values you have entered in the index section.
The document types appear based on the group to which you belong and the location you are accessing. If the group has rights to that location then the document type list is populated so you can select the document type from the drop-down list.
# Capture Area
The capture area is specific to each type of capture. These are detailed in the next four topics.